By Eve Flanigan
A recent column discussed selection of firearm-mounted and handheld lights. This article assumes you’ve chosen your perfect light(s) and are ready to practice their use. The focus here is on handheld light techniques, since that should occupy the majority of your light use, though many of these principles also apply to gun-mounted flashlights.
Light Storage
It would seem common sense that your tactical flashlight should be as accessible, or even more accessible, than your handgun. Some people I know carry a small but powerful tactical flashlight in a pocket anytime they leave the house. I personally keep one flashlight at my bedside, two—one headlamp and one handheld—on the key hook just inside the house door I use the most, and a third in the console of my vehicle. In short, there should be a light in the places where you’re most likely to need to wander or search into darkness.
Maintaining your lights should not be overlooked. For the lights you use rarely, change batteries once per year—ideally on a day that’s significant to you and you’ll remember. For those you use often, change batteries quarterly or as needed. If you’re a faithful quarterly smoke-detector battery-replacer, just add your favorite flashlights to that day’s chore.
Principles of Light Use
Two basic principles apply regardless whether your light is handheld or firearm-mounted:
- Safety first: Remember from the first article, it is not okay to use a firearm-mounted light as a general-purpose flashlight. Use of a gun in coordination with a light should be restricted to presenting the gun in the direction of a confirmed threat or practice target. The safety rule “never allow the muzzle to cover anything you’re not willing to destroy” applies to gun/light use.
- As little as possible, as much as necessary: The light’s purpose is to navigate, identify a target, signal or aim. Having it on at other times can have negative consequences. If you’re in a threat situation, the light gives away your location. As your eyes adjust to its artificial illumination, your ability to see darkened areas is diminished or even temporarily eliminated (for example, if the beam passes over a mirror or white wall). And if your foray into the dark is a lengthy one, battery life is precious.
Errors to Avoid
Common errors seen in light use practice occur just before and after a shot sequence.
At the start of a practice drill, inexperienced light handlers often sweep the ground with light as the gun is drawn, drawing a visible line between themselves and the target. To avoid this, you’ll need to practice orienting the light in the target’s direction before turning it on.
In the same vein, keeping the light on after shooting continues to mark your position. After the shot sequence, you should practice immediately turning off your light and stepping aside from your shooting position if it’s safe to do so. Remember, what people do in practice, they generally do in a self-defense situation! Step aside, light off. Resist the temptation to inspect paper targets using the light immediately after firing.
Three Useful Flashlight Techniques
There are numerous accepted methods of shooting with a handheld light, but over the years I’ve come to favor three. To practice these, you’ll need a tailcap-switch light as described in the first article.
Competence with single-handed shooting is a prerequisite for two of these techniques and helpful with all three. It’s not hard to become proficient with one-handed shooting and it’s a good idea to be comfortable with that before adding a flashlight.
To begin each of these drills, hold the flashlight in your support-side hand at chest level, lens facing the ground, thumb on top of the switch. This provides for quick deployment of the light during the draw while minimizing the risk of muzzling your flashlight hand. With your support hand in this position, you’re also poised to block or strike with that hand or elbow if necessary.

1. Jawline index:
Hold the light horizontal with the middle joints of fingers resting on the cheek or jawline. If your handgun doesn’t have night sights, this method will light up both the rear and front sights. There’s no need to aim the light, as it will naturally shine where you look. With the support-side hand holding the light, the primary arm bears responsibility for accurate aiming and firing. The jawline index is favored by many for its speed and simplicity. Its usefulness is limited, however, to shooting. It is not a searching or navigating technique.
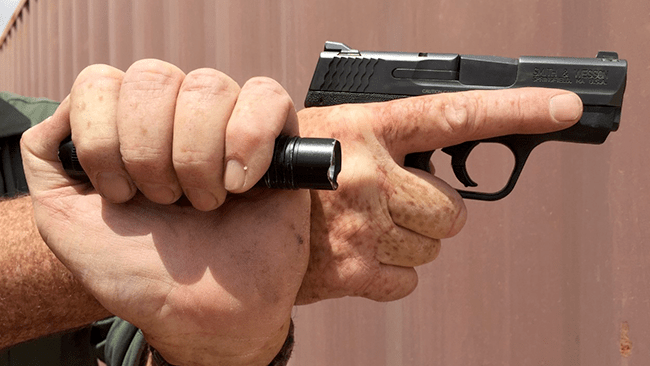
2. Harries:
Named after the law enforcement officer who popularized it, Harries (pronounced hair-EEZ) offers more support to the firing hand than other methods discussed here. It takes practice and wrist flexibility to do it well.
The Harries position begins on the draw. Rather than the support hand joining the grip as in a normal draw, it passes under the gun hand. The light-holding support hand wrist is bent upward so that the back of the light hand presses firmly against the back of the gun hand. Maintaining pressure between the hands provides some recoil mitigation. With the light hand’s fingers clamped around the light and holding it sufficiently high, the front sight is illuminated and the rear sight is visible as a silhouette. When operating guns that are shiny or light-colored, the Harries technique can eliminate annoying, dangerous glare that might be present with a jawline index.
A common error when learning Harries occurs when the shooter shortens their arm extension and softens their elbows and wrists compared to normal firing. This can cause the gun to malfunction. Remember to extend the arms as much as possible and stiffen wrists.
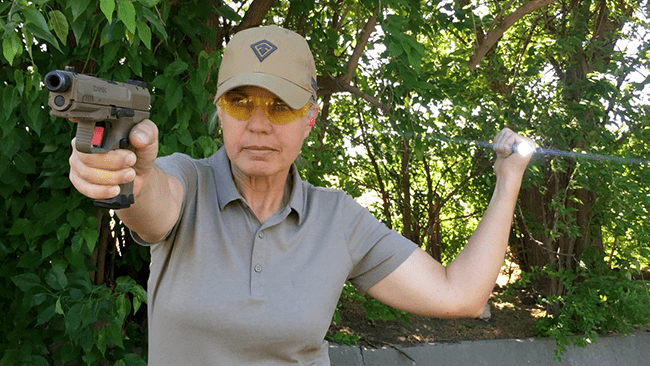
3. Modified FBI
The traditional FBI technique entails extending the flashlight hand away from the body and shooting one-handed with the gun hand. The logic behind this method is that it is intended to draw incoming fire away from the torso in a threat situation. Its drawbacks are that it leaves the gun’s sights unilluminated, and most people feel better-balanced with their arms closer to them when firing.
The FBI technique has the advantages of the gun being ready but not necessarily pointed at everything in sight. With an independently operating flashlight hand, you’re also now free to use that light to search high and low. Finally, so long as the gun has night sights, this is the most flexible of these methods.
Reloading and Malfunction Remedies with Lights
If you’re going to be dedicated to practicing and working with a light in preparation for a self-defense situation, then managing reloads and malfunction clearances while holding a light are necessary, related skills.
Depending on the size and shape of the light, as well as the relative size of your hands to gun, there are two common ways to hold the light while dealing with these chores. One is to slip the light, lens facing rearward, into the armpit of the arm handling the firearm. The other is to set the light between the middle and ring finger of the gun hand. The light should first be turned off before transferring it to the holding place.
A competent gun carrier will learn and practice all these techniques, as different situations could make one preferable over another. Aim to master at least one, never neglecting safety nor how to hold the light during reloads and malfunctions.
You may also be interested in:
https://www.letsgoshooting.org/2020/06/02/add-lights-to-your-defensive-handgun-sights-setup/
https://www.letsgoshooting.org/2020/05/21/seeing-clearly-defensive-handgun-sights/