header.php

Bore Sighting Basics: Make Rifle Sight In Quicker and Easier
Sighting in a rifle (or other long gun with a scope) should be a relatively quick and easy process, but that isn’t always the case. You can spend lots of time and lots of money in the form of wasted ammunition trying to get a gun wearing a new optic zeroed in, and the process can be very frustrating. But there is a way to get your gun on target and on your way to fine-tuning without incurring that frustration and wasted ammo. It’s called bore sighting.
Bore sighting is the process of aligning the bore (center of the barrel) of a gun with the sights on your firearm. It’s a relatively simple process and one that all shooters, including new shooters, need to learn. It also takes just a few minutes to bore sight a firearm properly.
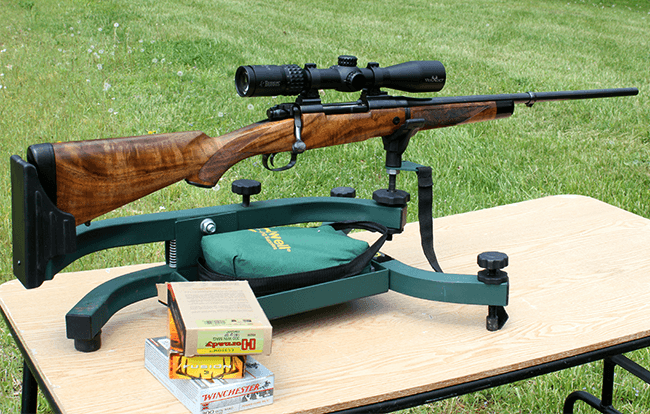
A solid vise or a rest such as the Caldwell Lead Sled is essential to proper bore sighting. You must not allow any movement in the gun while you’re adjusting the scope.
Get a Solid Rest
To begin you’ll need an unloaded gun and a solid rest. The key to bore sighting is eliminating movement in the gun while you’re performing the task, so a vise or a product like Caldwell’s Lead Sled are your best bets. Once the unloaded gun is secured, you’ll need to be sure that the center of the bore is aligned with the center of the optic you’ve mounted on it. In other words, you want to visually match the position of the center of the bore with the center of the optic.
To do this, place a target about 25 yards downrange from where you have your rifle pointed in its vise or other secure rest. There’s no need to go any further than that, because with bore sighting, once you’re bore sighted at 25 yards you’ll be “on paper” when shooting live ammunition at 100 yards (and you can see right away how that can eliminate the wasted ammunition and frustration so many shooters put themselves through with a new optic when they don’t bore sight first). Additionally, being just 25 yards away makes it easier to see the center of the target. You want the target to offer a large, highly visible center. Personally, I like targets with a round orange bull’s-eye.
Once your target is set and the unloaded gun secured in the vise or other solid rest, you next need to be able to see down the barrel from the back of the receiver. For bolt-action rifles, that means you simply remove the bolt. With AR-types, you’ll need to remove the upper and pull out the charging handle and bolt so you can see down the barrel, then put the upper with its optic back in place.
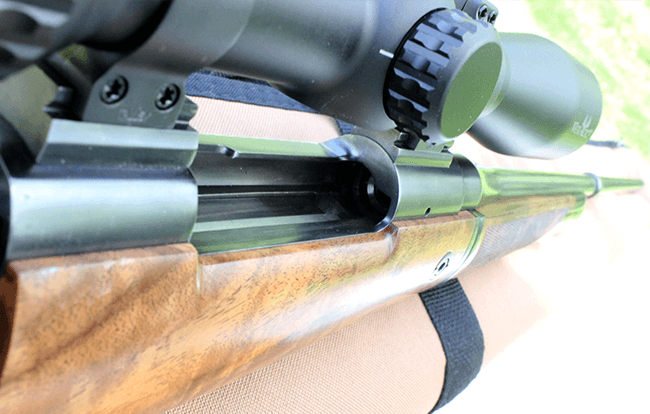
Not only must your gun be unloaded when bore sighting, unless you’re using a laser device, but you’ll also need to remove the bolt from a bolt-action or the charging handle from an AR-type rifle in order to see down the barrel from the rear of the gun.
Can you plainly see the center of the target when you look through the barrel from behind the rifle? Good. Now position the gun so that the target’s center is as close as possible to the middle of the bore.
Moving the Reticle
Next comes your optic. Without moving the gun at all, adjust your optic so that its reticle, too, is centered on the middle of the target. Yes, that means you will have to loosen the screws or hex nuts on your scope rings a little to twist the scope if needed to be set the crosshairs, reticle or other marks properly horizontal and vertical, if that hadn’t been accomplished during the original scope mounting process. If your scope’s marks are properly horizontal and vertical but not on the center of the target, you want to move those crosshairs/reticles via the scope’s external turret adjustments. If you have succeeded in aligning the scope properly with the target without moving the gun, then if you drop down behind the gun to look through the barrel again, the target should still be centered. If not, re-center the target with the rifle’s bore by viewing the target through the barrel, then move up and look through the optic and adjust again as necessary to re-center it. Going back and forth between barrel and optic, fine-tuning as you go, will eventually have both centered on the target at the same time and the bore sighting process will be complete. Tighten down any screws on your scope rings as needed, then reassemble your rifle, move your target to the 100-yard line and proceed to sight in and shoot for groups with live ammunition.
Modern Bore sighting Solutions
Companies like LaserLyte offer laser bore sighting devices and bore sighting kits. There are many advantages to bore sighting- using a laser. First, they are a far more precise method than using your eye. While visually bore sighting a firearm may get you on paper at 100 yards, laser bore sighting will put you much closer to center and will require less ammo in the long run when zeroing the rifle. Second, you don’t have to look down the barrel to bore sight your gun when using a laser (the gun should always be unloaded, though), because the laser devices are inserted in the muzzle of the rifle, then the rifle moved so that the laser hits the center of the target. Then all you have to do is move the scope’s reticles to be centered on the laser dot. The bigger advantage to this is that a laser can be used to bore sight lever-actions and other guns that don’t have removable bolts or can otherwise have their barrels viewed through from the breech end.
To bore sight with a laser bore sighting tool, fit the laser unit into the barrel of an unloaded gun and turn on the laser, usually via a rotating knob on the body of the bore sighting device. Position the gun so that the laser dot is centered on the target. (Can’t see the dot well? In some cases that red laser dot can be lost in bright sunlight, so I prefer to do my bore sighting in the morning or evening when the ambient light is softer and it’s easier to see the dot.) Now move to your optic. You should be able to see the red dot on the center of the target through your optic, so now all you have to do is move the reticle via its adjustment turrets until the center overlaps with the laser dot on the target. Remove the laser device from the barrel (failing to do this could have disastrous consequences), move the target to 100 yards, and commence zeroing in with live ammunition. Now, keep in mind that bore sighting likely won’t make the gun shoot exactly to that point of impact, but it will be very close and, with many rifles, you can be zeroed within a few shots.
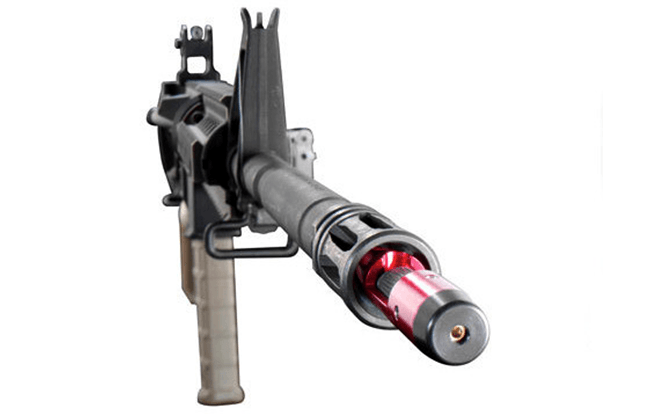
A laser bore sighting device, such as this one from LaserLyte, gets inserted in the muzzle of the firearm. It’s a great tool for all guns, but allows the user to bore sight lever-actions, handguns, shotguns and other firearm designs that don’t permit viewing down the gun’s barrel from the rear.
Though most people think bore sighting is just for rifles, it can be used on a variety of firearms, both long guns and sidearms. As a handgun hunter, for instance, I use a bore sighting laser often to ensure that my pistol scope and the bore of my gun are aligned. Bore sighting works well with shotguns, too. More and more turkey and predator hunters are using red dot optics on their scatterguns, so it makes sense to bore sight these guns as much as it does a rifle, and it certainly makes sense for those deer and other big-game shotgun hunters who employ an optic on their slug shotguns.
Bore sighting is a simple way to save time and money, and even if you’re a brand-new shooter you’ll be able to get your gun on target before you ever fire a shot. If you can afford them (and many are quite reasonably priced) a laser bore sight device makes the job much simpler and the devices can be used in a variety of guns. Either method will reduce headaches on the range and make your time shooting more enjoyable.