What You Need to Know about Mounting a Scope
At the beginning of the 20th century, telescopic sights, or scopes were rarely seen on firearms. Today, scopes are commonly mounted on rifles and even shotguns and handguns. There are many advantages to having a scope on your gun, including variable magnification that allows you to zoom in on distant objects, and “reticles” — the crosshairs within the scope — simplify aiming. Today, virtually all hunting rifles are “drilled and tapped,” which means they have holes drilled in the top of the receiver by the factory or a built-in “Weaver-style” or “Picatinny” rail that enable anyone to mount their own optic.
Scope mounting may seem like a daunting task for a new shooter, but it’s really quite simple. Here’s how to get your scope mounted (I’ll contain the conversation to rifles, though the process is relatively the same with shotguns and handguns), so you’re ready to head to the range.
Selecting a Scope
You’ll want to find a scope that fits your budget and your firearm. You can select between a “fixed-power” scope (those with 4x magnification are the most common) or a “variable magnification” scope. Variable-power scopes allow you to change the magnification within a certain range; 2x-7x and 3x-9x variables are both popular.
One key to selecting a scope that fits your gun and your intended shooting purposes is to choose a scope with an “objective” — the round part of the scope that houses the front lens — that isn’t too big to fit on your gun when it is mounted. Serious long-range rifles may have objectives of 50 or even 56 millimeters in diameter, and so scopes with objectives of that size can actually touch the barrel on a gun not designed to accommodate such large optics. If you’re just starting out, look for a scope with an objective from 30 to 40mm, a much more common size for hunting and general target shooting.
I’ve talked about two aspects of scopes now, their magnification and their objective size. That’s because that’s how you’ll see various models of scopes described. For example, a 3-9x40mm scope is one that has variable magnification ranging from 3x normal vision to 9x normal vision, and it has an objective size of 40mm in diameter.
See more rifle tips from Ryan and NSSF.
Selecting Bases and Rings
There are typically three components to scope mounting: bases, rings and the scope itself.
“Bases” are the part of the mounting that attaches directly to the firearm, usually with screws, and they provide — as the name implies — the base that supports the rings and scope. Bases attach to the holes that are drilled and tapped into your firearm (I’ll cover Weaver-type and Picatinny rail mounts in a bit). You can select a two-piece base or a one-piece base, whichever fits your personal taste (two-piece bases are most popular), but you will need to choose a base or pair of bases that fit your firearm — there are different bases for different brands and models, and your local gun store can help select the correct bases for your gun. Once you have the correct base or bases, you’ll secure them to the top of your unloaded gun’s receiver, lining up the holes in the bases over those factory-drilled holes in your rifle’s receiver and tightening them down with the provided screws.
The scope bases are screwed to the firearm’s receiver, which should be drilled and tapped. It is essential that the bases be properly secured since they tie the scope and rings to the rifle itself. The lever on the side of these bases allows the rings to be released, and these “quick release” rings and bases allow the shooter to remove the scope to use iron sights or to switch scopes.
As I mentioned, some rifles come with bases as part of the receiver. Some look like the types of bases you would buy separately, but they are machined into the gun. You’ll see such a design is referred to as having its bases “integral” to the receiver. Ruger’s Hawkeye and CZ’s 550 rifles are examples. Others such as the AR-platform rifles have “top rails.” Guns with top rails — commonly referred to as Weaver-style or Picatinny — don’t need a separate base. The rail is the base. This type of optics mounting platform typically looks like a rectangle of metal with a number of grooves cut across its width that accommodates a style of ring designed specifically for those grooves. Find the perfect scope at a Firearms retailer near you.
This is a CZ 557 rifle, which comes with bases already machined in the receiver. The rings are attached directly to the rifle, a very simple and secure design.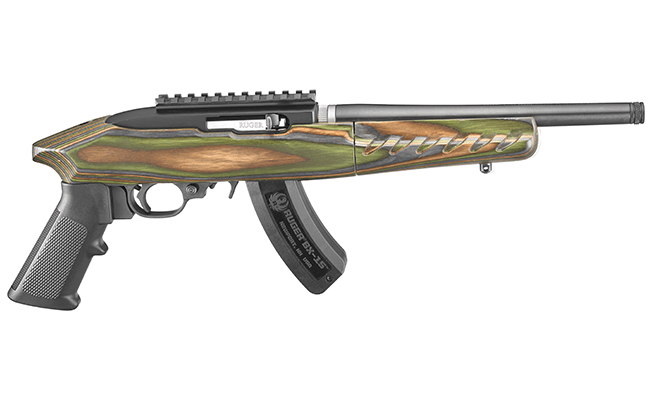
Ruger’s Charger pistol comes with a top rail on the receiver. For this reason, you won’t need to purchase bases because there are scope rings that will fit directly to the rail. Scopes aren’t just for rifles — they make sense on shotguns and handguns, too. Lots of manufacturers make scope rings, but no matter what brand you choose, you will need to decide on what ring height and width will work best for you.
Height refers to how high the rings hold the scope above the bore of the firearm, and your choice will have a lot to do with the overall size of the scope you’ve chosen, but also how your head is naturally positioned on the stock when the gun is on your shoulder and the size of the objective lens I talked about earlier. Most scope rings have heights labeled from low to extra-high, with medium being, as you might expect, the most common choice.
Scope ring width refers to the diameter of the scope’s tube. Most scopes have one-inch tubes and, so, this is the most common ring size. A few scopes, particularly expensive, long-range scopes, have 30mm or 34mm main tube diameters. Be sure the rings you select match your scope’s body tube diameter before you purchase them.
Once you’ve selected the rings to go on whatever base you have purchased or that is part of or came with the gun, install them on the bases (your gun is still unloaded). Some twist into a slot designed into the base, some screw in and tighten down from the side, but most traditional scope rings require a hex or Torx head tool. This tool may not have been included with your bases and rings when you purchased them, so check before you go home with your new setup that you have the tools you need to finish the mounting process.

Torx wrenches are commonly used to secure screws, and you must ensure that all of the screws in the rings and bases are properly tightened. It’s a good idea to have some extra Torx wrenches, and purchasing a wrench with a pressure gauge is even better though not absolutely necessary.
One note: The bases and rings you purchase should match — Leupold bases will not, for instance, usually mate with Talley rings.
Most scope rings have upper and lower or left and right halves. For scopes with rings that are divided horizontally, you’ll first attach the lower portion, the one with the stem-like portion, to the base. When both halves of the front and rear rings are securely in place, the scope is then laid in place over the two of them. Next, the upper half of the ring is tightened down with screws to hold the two ring halves together and, thus, the scope in position. For rings that are halved vertically, the left and right halves are tightened around the scope and the base or bases using side-mounted screws.
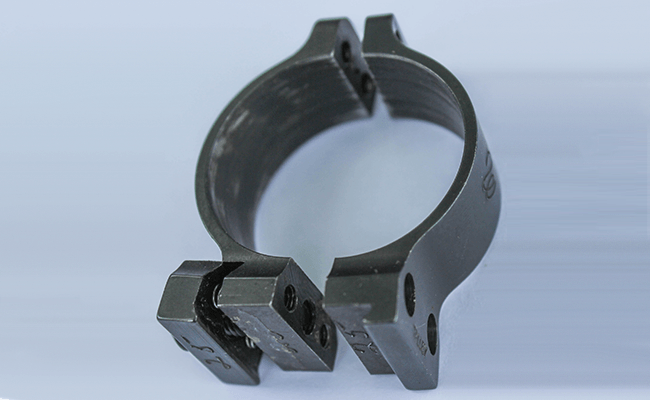
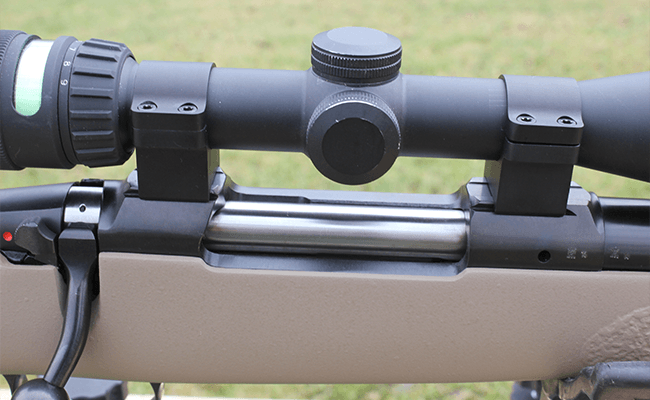
These are Talley rings, which are cut into left and right halves. The rings surround the scope and hold it in place, and the bottom of the rings attaches to the bases with screws. The Talley system is one of the strongest systems available.
Once the bases and rings are mounted and the scope positioned in place, everything can be tightened. Once the scope is secured between both sets of ring halves and the bases are locked in place, you can successfully call your scope mounted! Here are a few other tips to make the process even easier:
- Make sure your gun is completely unloaded and there is no ammunition in the room. Remove the bolt from bolt-action rifles and pull the toggle back on a semi-auto to lock the action open.
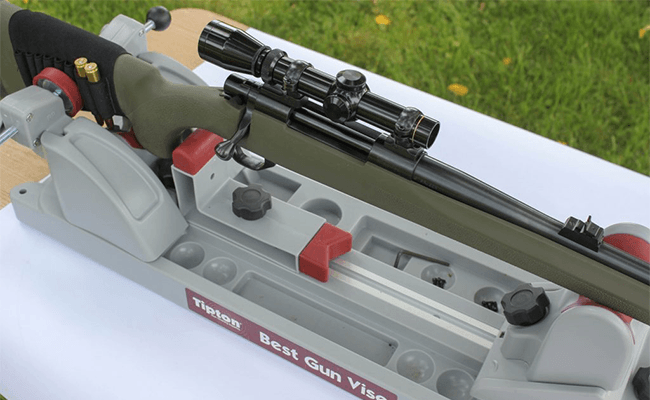
- Put your rifle (or another firearm) in a gun rest or vise specifically designed for firearms (one that protects the stock and fore-end when the vise is tightened) and make sure it securely holds the firearm without rocking or turning it as you work on it. [Scope 1: Having a gun vise like this one from Tipton makes scope mounting simpler. The gun is secure, and all of your tools are arranged close at hand. ]
- Gun companies often ship rifles with “plugs” inserted into the scope base holes they drilled before sending the firearm to the retailer. These will need to be removed with a screwdriver, usually a flathead, so have one on hand. Base mounting screws, on the other hand, usually require Torx tools.
- Metal parts on new bases and rings may need to be de-greased. When you’ve completed that task, apply a very thin layer of oil between the underside of the bases to protect against corrosion where it comes into contact with the rifle.
- Apply even screw pressure when tightening down bases and rings. Most scope rings and bases have a pressure range that tells you how tight they should be. In general, the scope should be secure and the screws should be tight but not so tight that they are damaged or cannot be removed. One good tool I’ve used for getting this right is Wheeler Engineering’s affordable FAT Wrench, which allows you to change the pressure in five-pound increments. No matter what tightening tool you choose, never turn a screw so tightly that the tool you’re using cuts into the hex head hole or screw slot and damages it.
- To get your scope rings lined up straight over the receiver, use a wooden dowel. I keep a one-inch wood dowel on hand just for this task. All I do is insert the dowel through both rings and carefully push or pull one end until the dowel is positioned evenly in line over the receiver and barrel. If I’m working on a bolt-action rifle, I’ll stand behind the buttstock and shift my view from the two rings and the open bore of the rifle that I can see because I removed the bolt. Of course, you can’t see down the bore of a semi-automatic from this position, but you can still evaluate whether the rings are lined up and centered over the top of the receiver
- Don’t tighten you scope rings down too early. Once you have the scope generally in place, you’ll want to check its reticle to be sure that it is properly aligned both vertically and horizontally over the bore before securing the top of the ring. Take your gun out of the vise or rest (still unloaded) and mount the gun to your shoulder and put your head on the stock in its most natural position. Making sure you’re standing straight, move your head slightly and until you see the reticle clearly — by clearly I mean so that a full clear sight picture is your view. A scope that is properly positioned allows you to raise the rifle and see clearly through the scope from edge to edge of the sight picture with no black around the perimeter.
If you’re seeing shadowing in your sight picture and you have to move your head backwards or forwards too much in order see the clear picture (so much that you’re crammed too far forward over the stock or too far back so that your head lifts off the stock), you may have to move the scope either forwards or backwards in its rings. Now, you may have to live with some adjustment to your shooting position — you want to keep the scope far enough away from your eye that you won’t get hit when the gun recoils — but this should be a small amount of change, not a drastic one.
Once you have what you feel to be the distance that best accommodates both a full sight picture through the scope and your most natural shooting position, then look to see if the reticles are straight. Do you have to roll the gun one way or the other so that the lines are perfectly horizontal to and/or vertical to the horizon? Return the gun to the vise or rest and gently rotate the scopes in the rings (loosen the screws just a little bit so that they don’t scrape the scope body as you turn it) and reevaluate until you have the proper alignment.

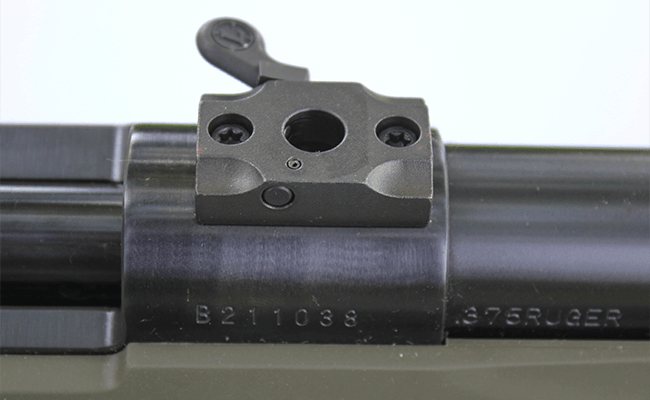
The front base and ring are shown properly installed. Don’t tighten the scope down until you are sure that the crosshairs, or reticle, are balanced and even.
- When you believe you have the scope mounted correctly, begin to tighten your ring screws. Most people work the screws one at a time, turning a half-turn on one, then the next and the next and so on, so that the scope remains straight within the rings. You want to progress through this tightening process until the scope cannot be moved by you if you carefully try to twist or slide the scope within the rings. A scope not held tight enough within its rings can be damaged during shooting. (In fact, it’s a good idea to occasionally check the tightness of bases and rings every few shooting sessions.)
- Once the scope is tightened down, test your gun’s action. Base screws are sometimes too long, and this can cause a problem when cycling the action. With no ammo in the firearm, cycle the action to ensure long screws are not a problem.
Test out your new scope at a range near you